Palletizing Plans
The Palletizing Plans page shows the results of the palletizing calculation for all submitted orders. Orders can be submitted via the Orders page or through the REST-API interface.
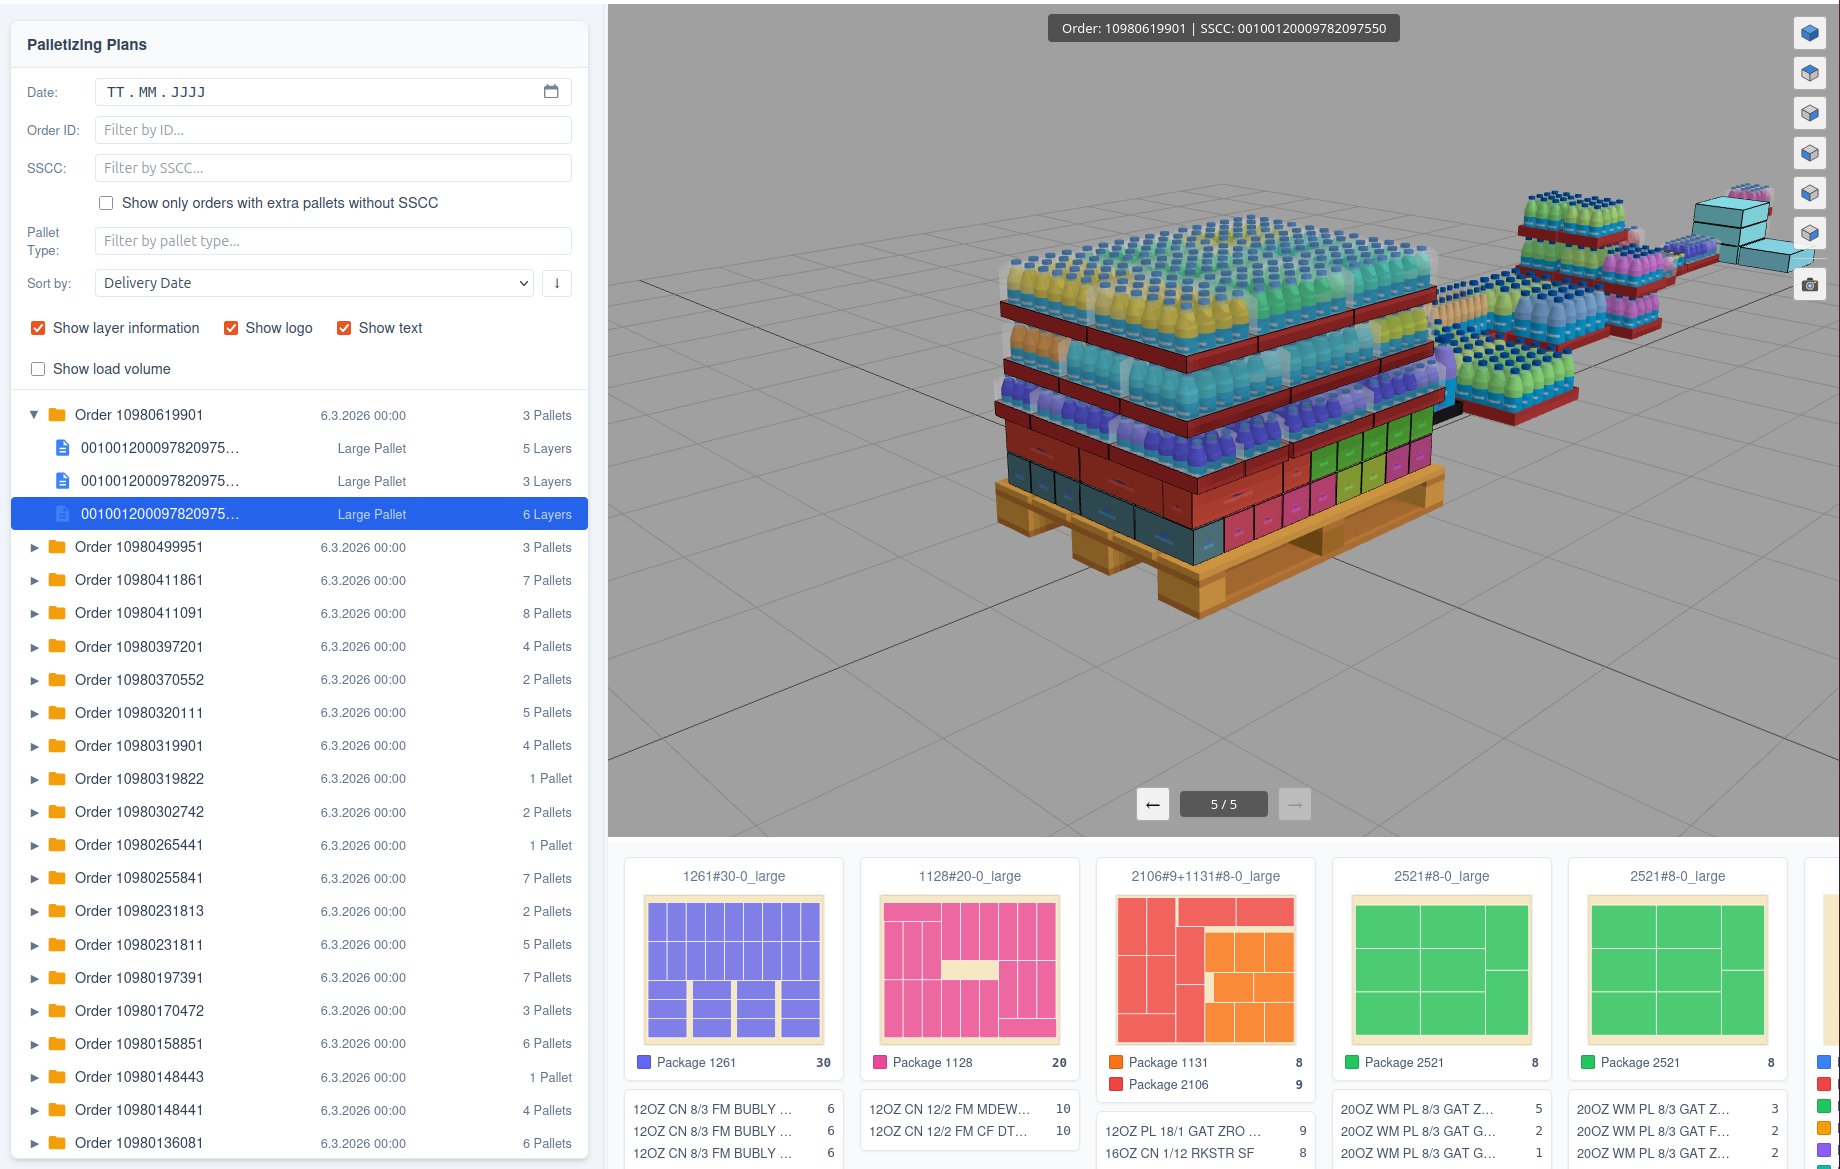
The Palletizing Plan page consists of three areas:
- A list of orders on the left side
- A 3D visualization area on the right side
- A 2D layer pattern visualization area on the right side below the 3D visualization area
The plan list is organised as a two-level collapsible tree:
- Order node (📁 folder icon) — shows the external order ID and total pallet count. Click the ▶ arrow to expand.
- Pallet row (📄 file icon, indented) — shows SSCC (or "Pallet {no}" if empty) | Pick zone names | Pallet type | Number of layers.
Clicking a pallet row selects it and triggers the 3D pallet visualisation and the 2D layer panel on the right. The sidebar width and the height of the layer panel can both be resized by dragging the divider handles.
The list of orders can be filtered by populating the above fields with the respective values.
| Filter | Explanation |
|---|---|
| Date | Show only palletizing plans for the specified delivery date |
| Order ID | Show only the palletizing plan for the specified order ID |
| SSCC | Show only palletizing plans that contain a pallet with an SSCC starting with this value |
| Show only orders with extra pallets without SSCC | Show only orders that contain at least one pallet with no SSCC assigned |
| Pallet Type | Show only palletizing plans palletized on the specified pallet type |
The list can be sorted by Delivery Date or Order ID using the sort dropdown. The ↑ / ↓ toggle button next to the dropdown switches between ascending and descending order.
With several check boxes the display of the page can be modified:
| Checkbox | Explanation |
|---|---|
| Show layer information | Shows the 2D layer information below the 3D pallet |
| Show logo | Shows the customer logo on the individual packages |
| Show text | Shows the customer name on the individual packages |
| Show load volume | Shows a wire frame indicating how tall a pallet can be loaded depending on the pallet type |
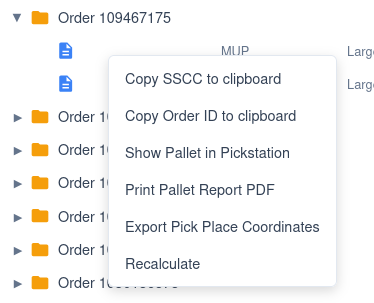
Context Menu in Order List
With a right-click on a pallet in the order list the following context menu is displayed:
| Menu Item | Action |
|---|---|
| Copy SSCC to clipboard | Copies the SSCC code to the clipboard |
| Copy Order ID to clipboard | Copies the Order ID to the clipboard |
| Show Pallet in Pickstation | Shows the pallet in the Pickstation screen |
| Print Pallet Report PDF | Generates a multi-page PDF report for the selected pallet (see below) |
| Export Pick Place Coordinates | Opens the robot pick-place export dialog for the selected pallet (see below) |
| Recalculate | Triggers a new calculation for the selected order (e.g. after master data changes) |
Export Pick Place Coordinates
The Export Pick Place Coordinates dialog generates a JSON file containing the robot pick-and-place commands for the selected pallet. It is opened via right-click → Export Pick Place Coordinates in the plan list.
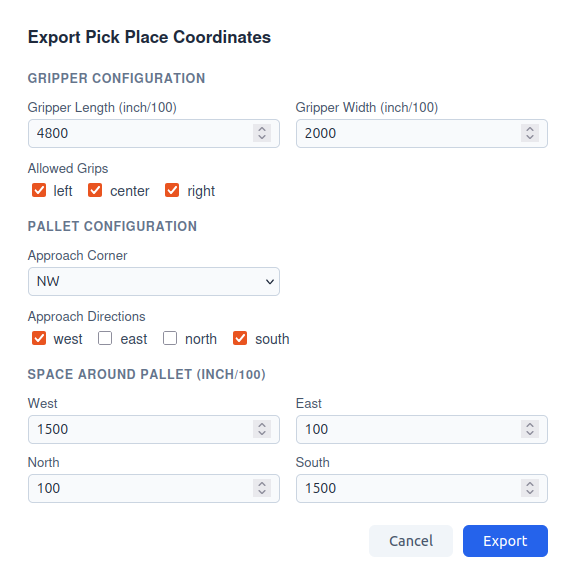
The dialog has two configuration sections:
Gripper Configuration
| Field | Description |
|---|---|
| Gripper Length | Length of the robot gripper in inch/100 (e.g. 4800 = 48 inches) |
| Gripper Width | Width of the robot gripper in inch/100 |
| Allowed Grips | Checkboxes selecting which grip positions are permitted: left, center, right |
Pallet Configuration
| Field | Description |
|---|---|
| Approach Corner | The corner from which the robot approaches the pallet: NW, NE, SW, SE |
| Approach Directions | Checkboxes selecting the allowed approach directions: west, east, north, south |
| Space West | Clear space to the west of the pallet in inch/100 |
| Space East | Clear space to the east of the pallet in inch/100 |
| Space North | Clear space to the north of the pallet in inch/100 |
| Space South | Clear space to the south of the pallet in inch/100 |
Clicking Export downloads a .json file named {SSCC}-{date}.json containing the pick-place command sequence.
Clicking Cancel closes the dialog without exporting.
Pallet Report PDF
The PDF report is a multi-page A4 document containing all relevant information about a single pallet. An example report can be downloaded here: PalletReport_example.pdf
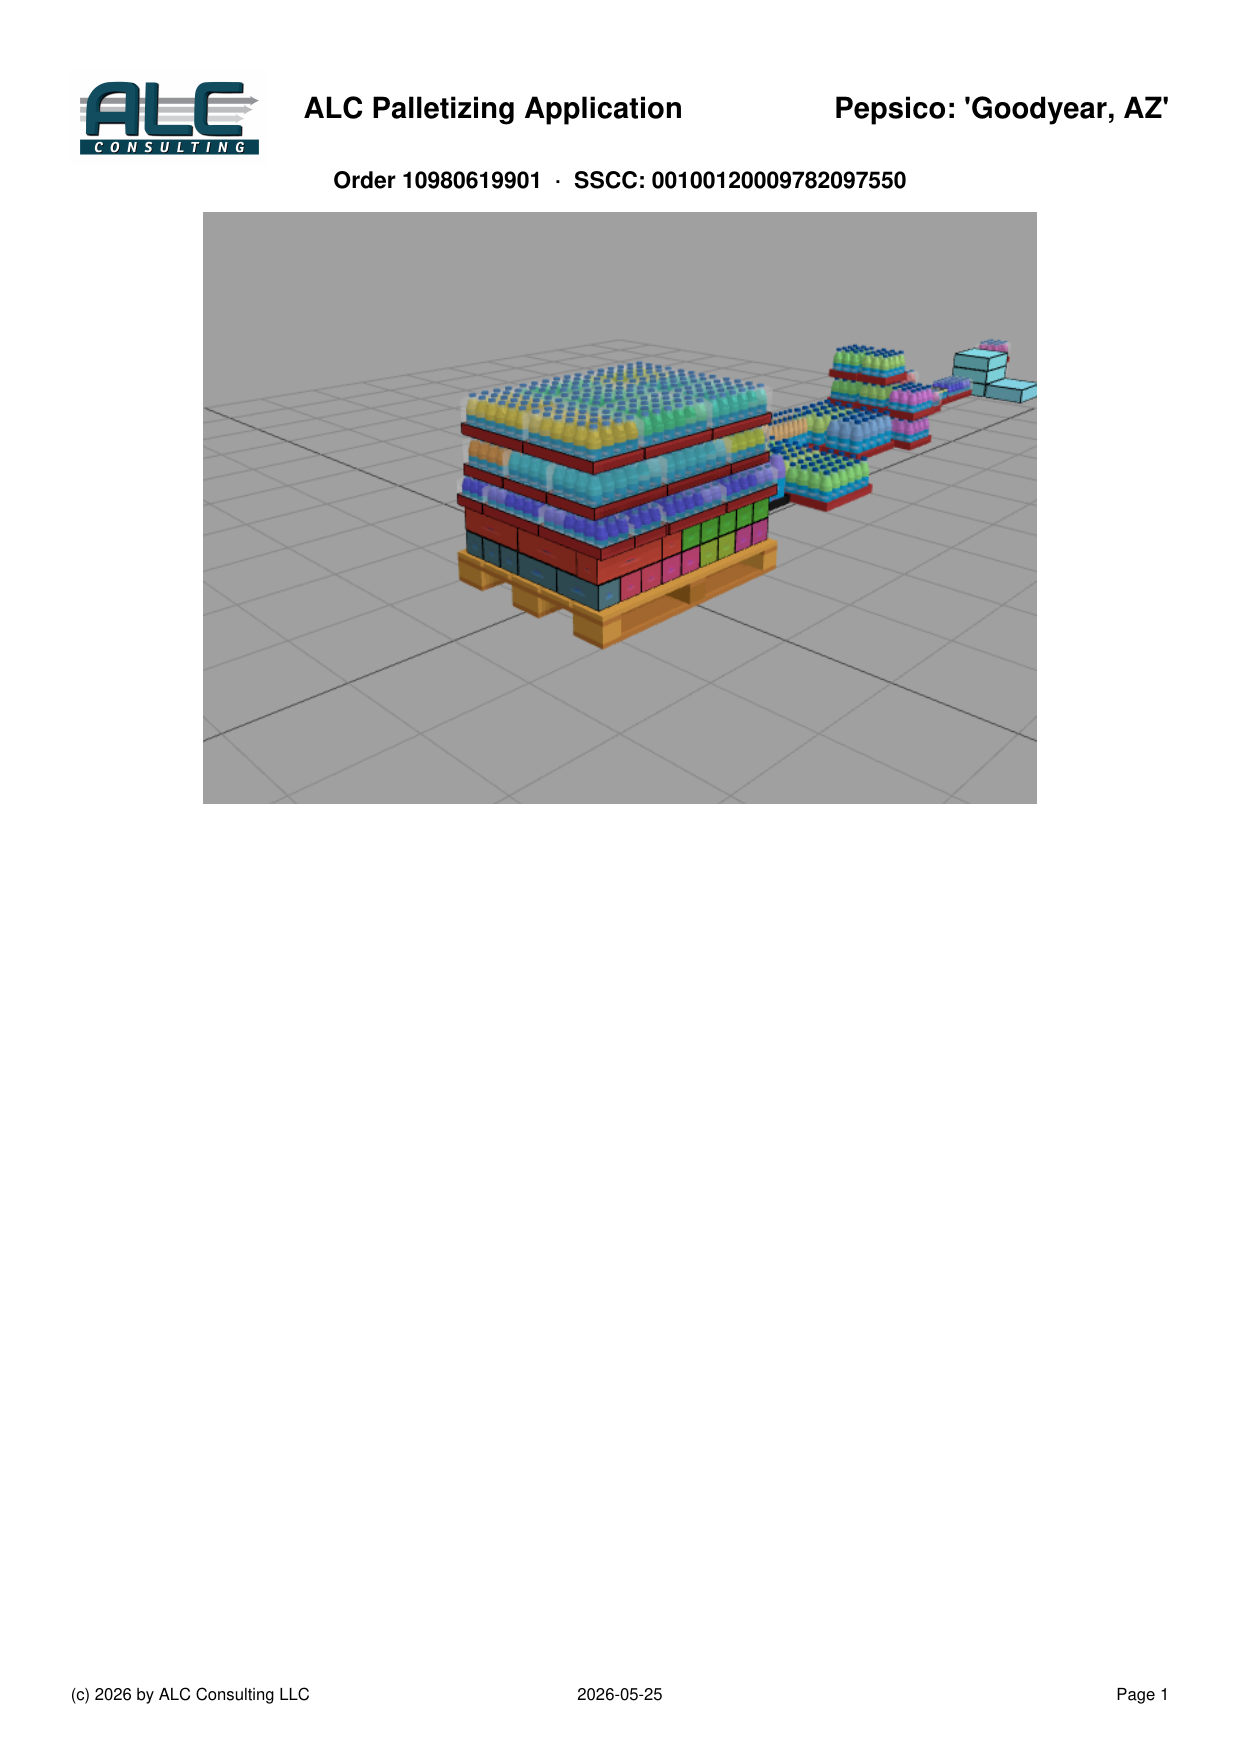 Page 1 – 3D View |
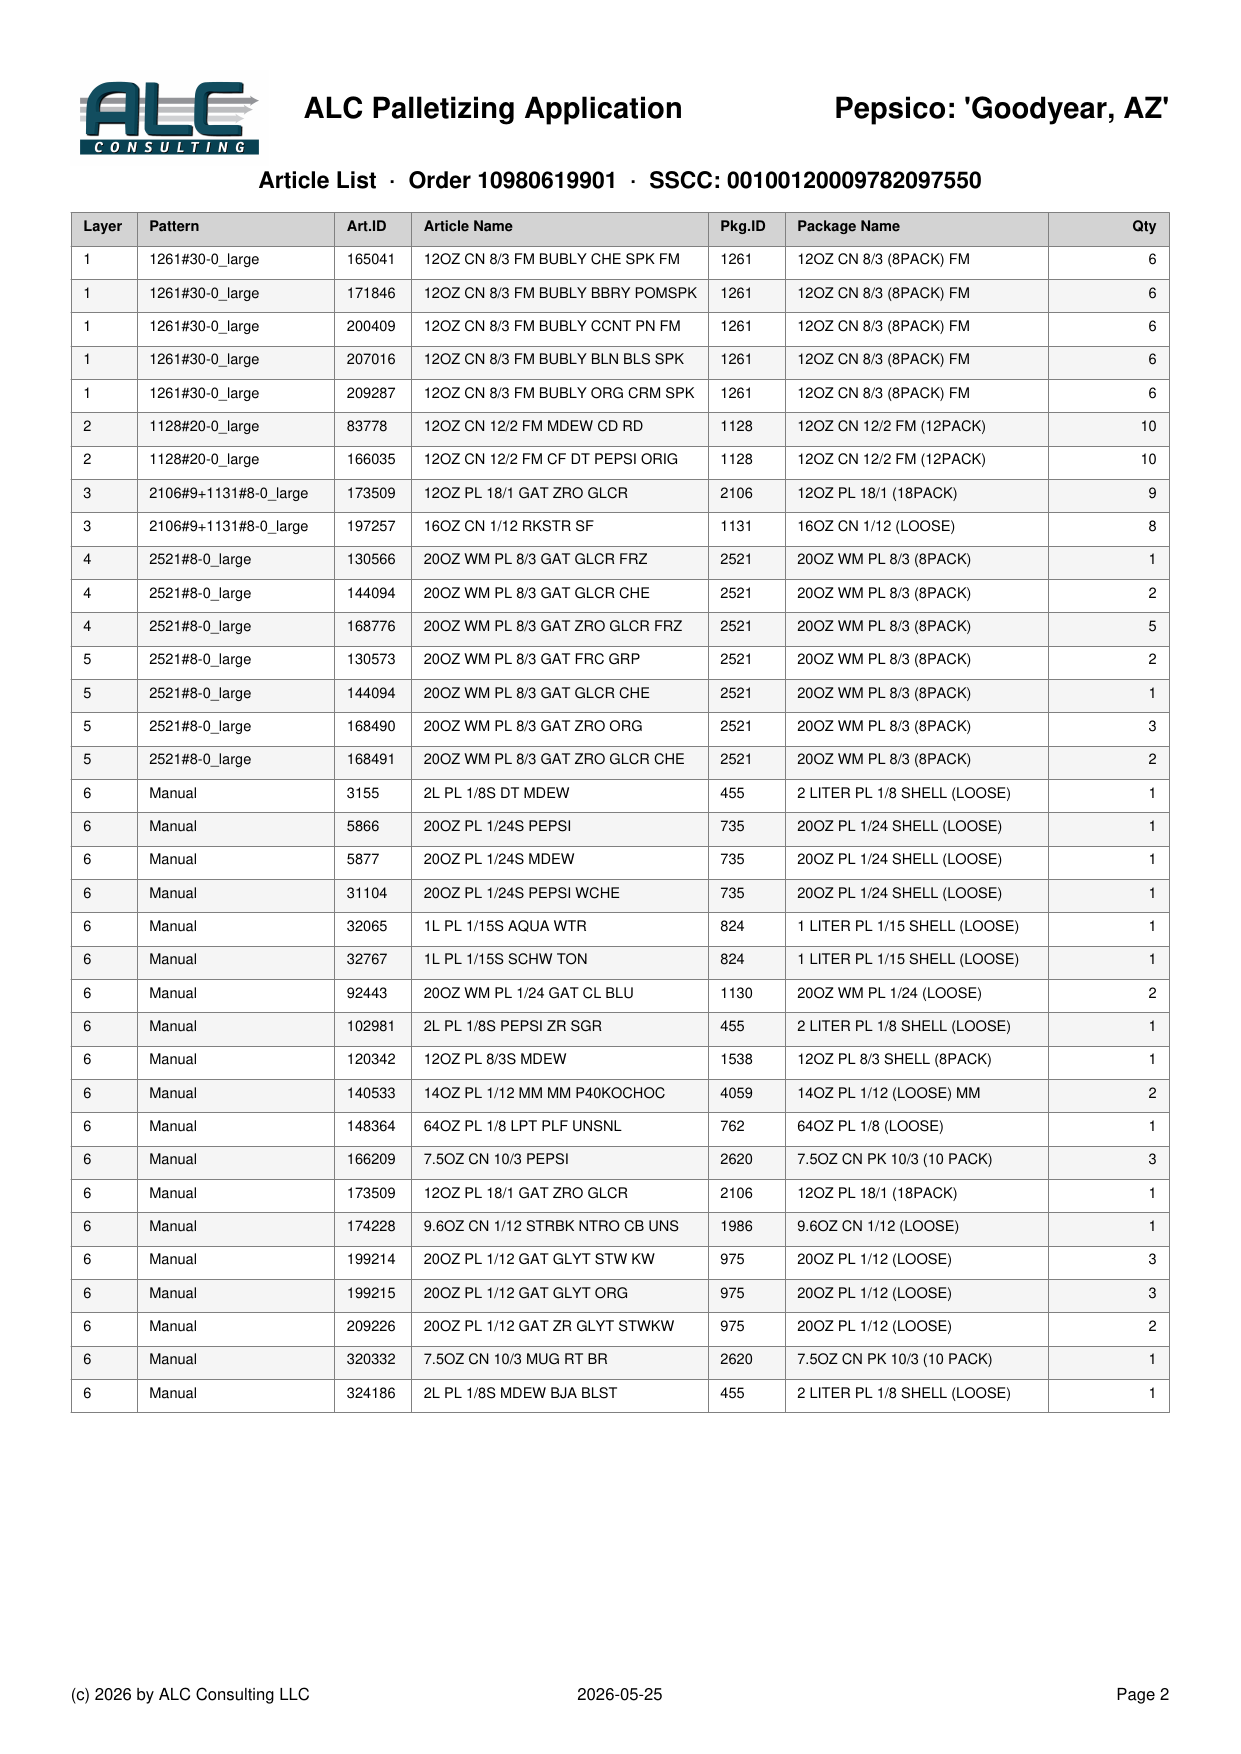 Page 2 – Article List |
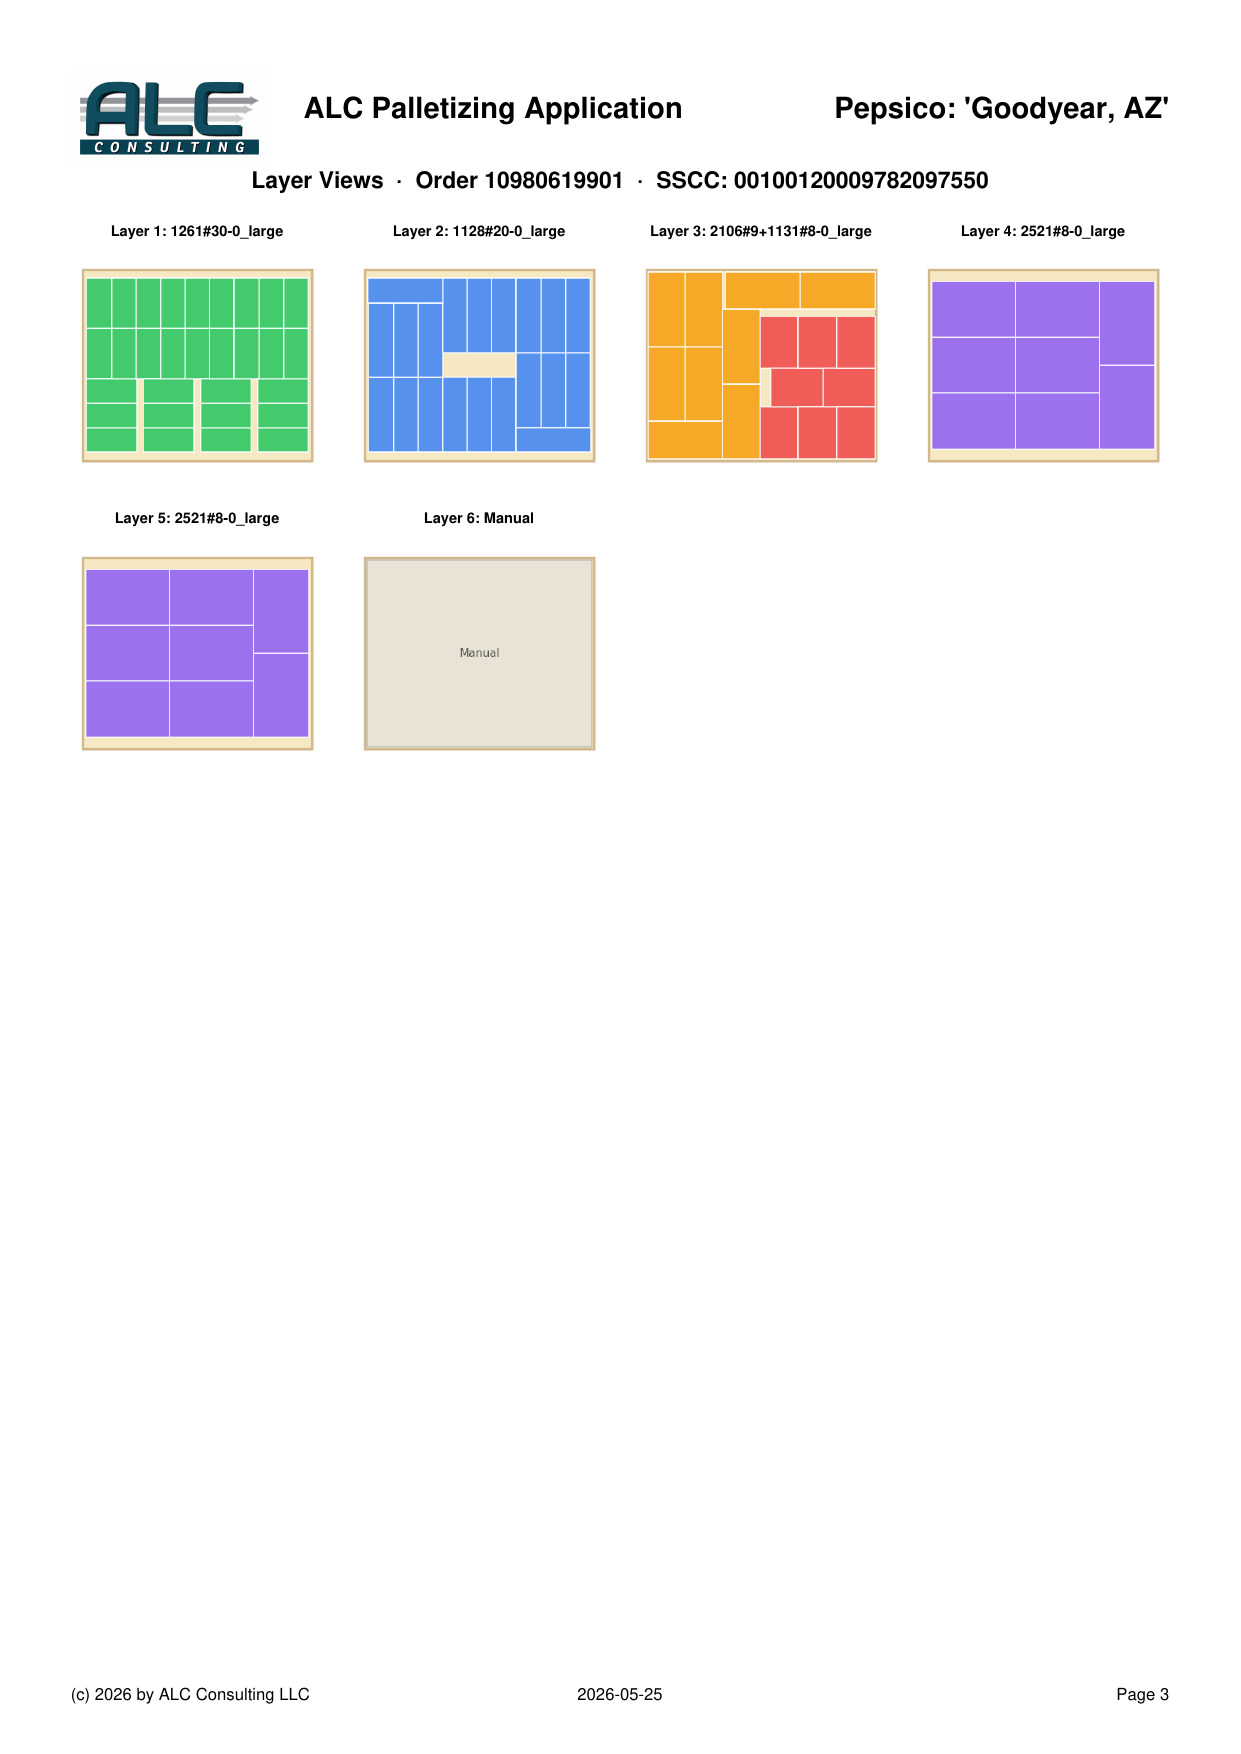 Page 3 – Layer Views |
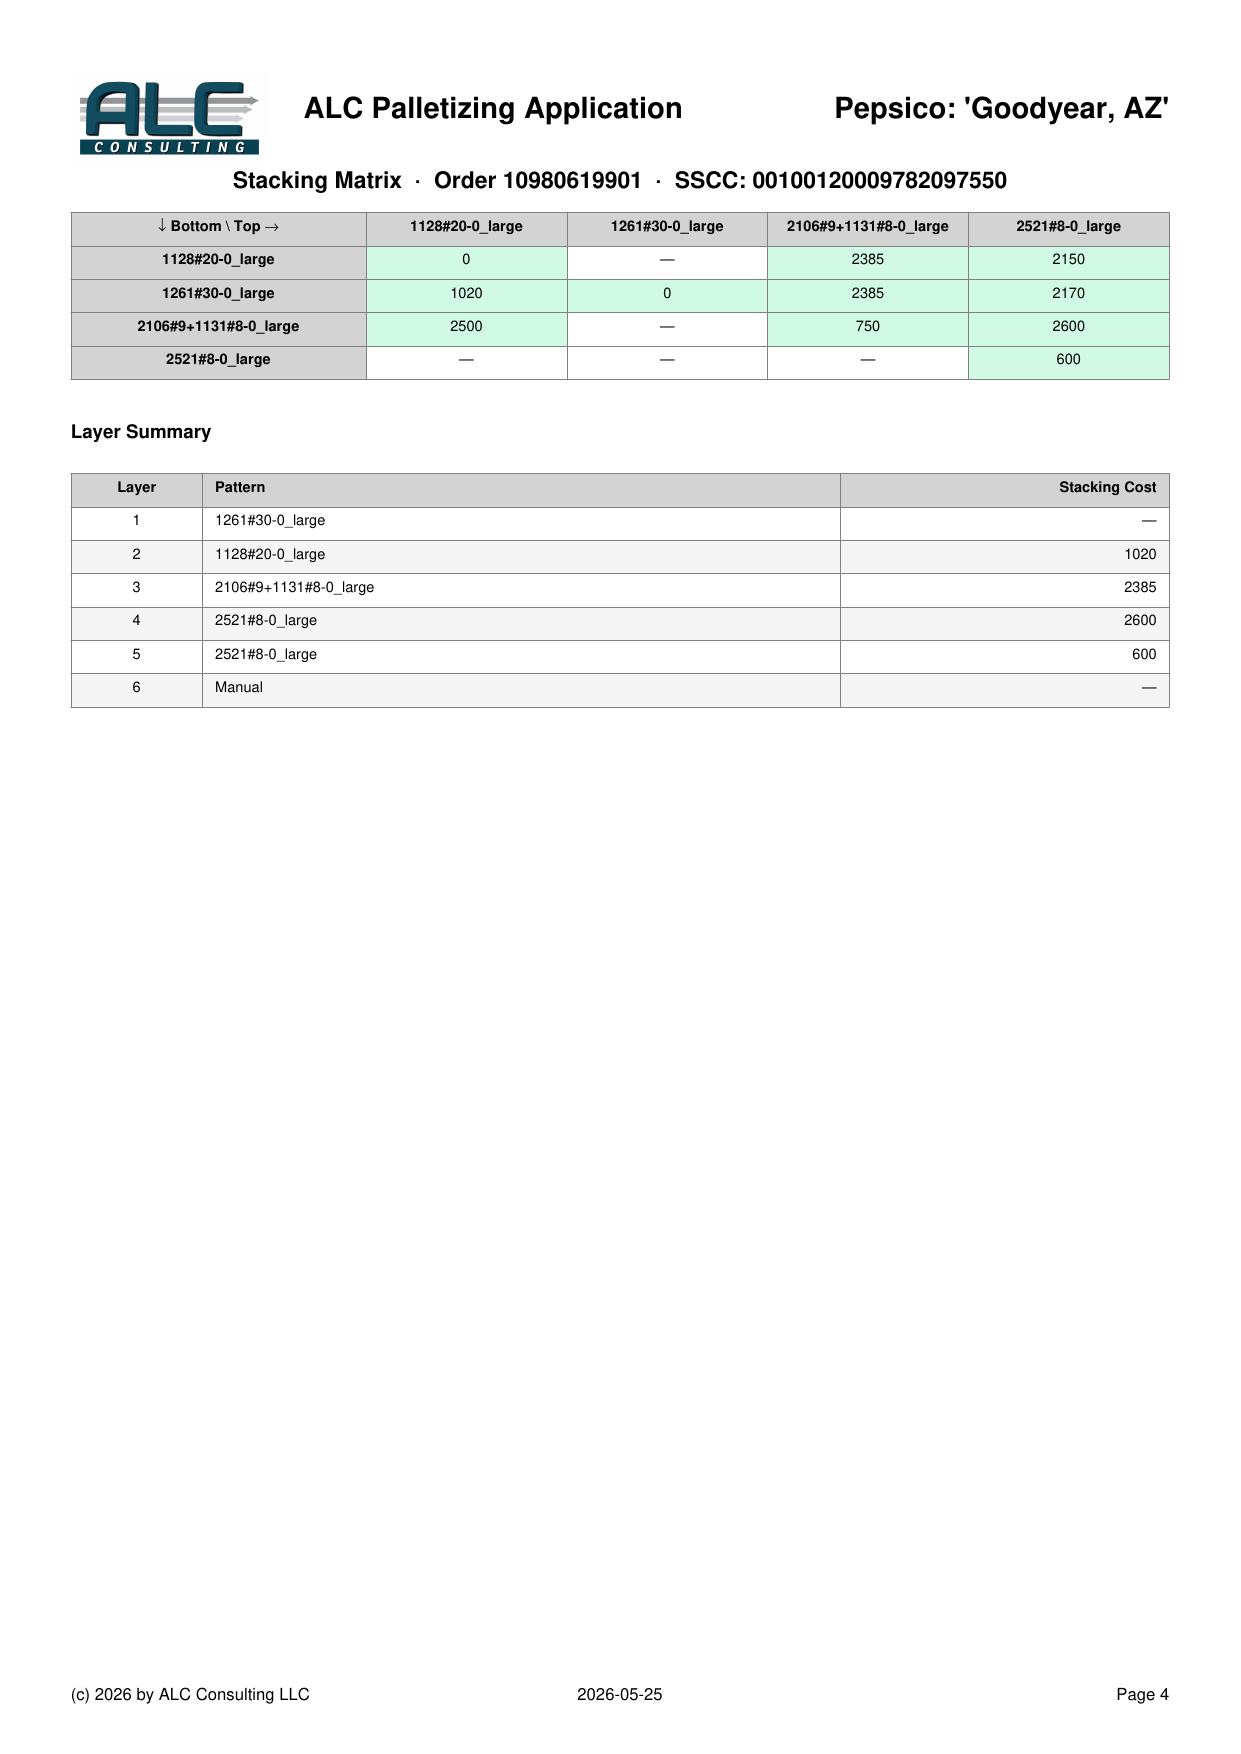 Page 4 – Stacking Matrix & Layer Summary |
Page 1 contains the company logo, application title, project name, Order ID, SSCC code, and a 3D screenshot of the pallet as shown in the interactive visualization.
Page 2 shows the article list – one row per article per layer, sorted by layer number and then article ID.
| Column | Description |
|---|---|
| Layer | Layer number (bottom = 1) |
| Pattern | Name of the layer pattern used |
| Art.ID | Article ID |
| Article Name | Article name as defined in the SKU Master |
| Pkg.ID | Package type ID |
| Package Name | Package type name |
| Qty | Number of cases in this layer for this article |
If the article list does not fit on page 1 together with the 3D view, it continues on a separate page.
Page 3 shows each layer as a 2D top-down view arranged in a 4-column grid. The label above each cell shows the layer number and the pattern name. Manual top-off layers are labelled "Manual".
Page 4 contains two tables:
Stacking Matrix – A pivot table showing the stacking cost for each combination of bottom and top layer pattern used in this pallet. Green cells indicate an enabled combination; grey cells indicate a disabled combination (marked with ✗).
Layer Summary – Lists every layer with its pattern name and the stacking cost applied when placing it on top of the previous layer.
| Column | Description |
|---|---|
| Layer | Layer number |
| Pattern | Pattern name (or "Manual" / "TML" for special layers) |
| Stacking Cost | Cost value from the stacking matrix (— for the first layer) |